 Click here to see us on Facebook
  Follow Me on Pinterest
Making the Braid
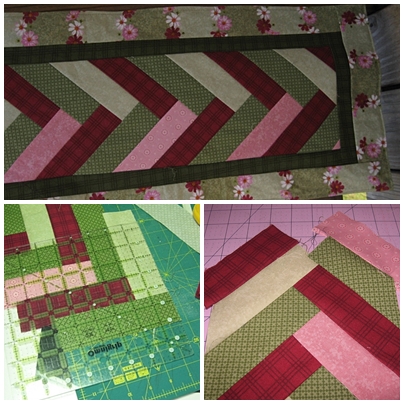 Holy cow...where did this month go to? One of the reasons that there has not been an update on the blog is that I have been toO busy to do it. Many items sold in June from Mainely Quilts in Kennebunk Maine so there has been a flurry of sewing to replenish stock. I have also set myself to use mostly fabrics from my stash purchasing only coordinating fabrics in order to make a specific item. This is what brought me to make this braided table runner - all fabrics from my stash! I had made a braided runner MANY years ago and went searching for the instructions I had used in a sewing magazine to no avail. I looked at some pictures out on the web of braided quilts and said..."I can figure that out". The braid starts out with a small triangle which you then add strips to slowly building the braid so the fist thing I had to figure out was the proper size of that triangle and the finished size of the braid before I added the borders. Using card stock and cutting out various and sundry size strips and triangles I was able to figure this out. I then had to chose the fabrics To get the look I wanted, I choose light, medium and dark fabrics. Some of the imagines I looked at had pastels on one side of the braid and darks on the other. Some had a 3 colored thing going on with all different values of fabric using scraps and others had no perceivable pattern at all. Obviously there are endless fabric choices and placements when making a braid.
Since I had a limited amount of the floral border fabric, this was going to determine how long the runner would be. I am not going to go into the details of how a braided runner is made but here is a link to a tutorial http://reannalilydesigns.com/2009/06/the-batik-braid-quilt-tutorial/ By the way I did not watch it. Seat of pants is seat of pants and that was the way I was going. I have the ironing board set up to the left of my sewing machine so I pressed every strip as I added it. I also took great care to have every strip come together at a perfect 90 degree angle. I checked it after I pressed it and trimmed when needed. I felt this would eliminate some of the grief when it came time to do the final trimming before added the borders. I had a vague memory from the last time I did this type of braid that getting everything even and square had been a bit of a pain. So my suggest is...trim that point as you go along! At the top of the braid as I was nearing the finish line, I could tell by the images I had looked at that shorted strips were added and at the final trim they would get squared up. The brad was to be 7-1/2" wide (13" once the borders were added) I am pleased that it came out very close to that considering I had no pattern to follow.
I delivered the runner along with some others and a couple of blueberry aprons to Mainely Quilts on Wednesday. John, the owner was pleased to see them since he was getting rather low on runners. He particularly made comment about the braided runner noticing how clean all the angles were. I told him it is amazing how good a result you can get it you take the time to trim and press as you go along. I was also pleased that this runner depleted my stash which is my overall long term goal. Mission accomplished!
- Sandy's blog
- Log in to post comments