 Click here to see us on Facebook
  Follow Me on Pinterest
Quilt as you go (QAYG) striped purse
 I am sure that I am not alone in my love of Kaffee Fascett fabric. I wanted to make a quilt as you go purse the same size as the folk art purse and thought this would be the perfect place to show off a Kaffee Fascett print. Since this is only my second attempt at making a purse, I spent more time planning it than I did actually making it. I detest having to throw out a project due to foolish mistakes so I always plan carefully.
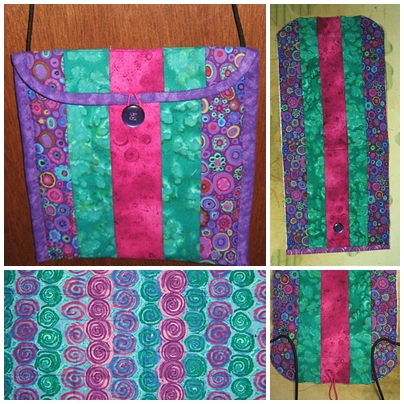
The folk art purse I made earlier in the week was in two pieces, the front and the back since the front of the purse was an 8" block with an appliqued bird on it. This purse was not going to have a block involved so it could be made all in one piece. What better place to use quilt as you go? Here is the link to my fist quilt as you go project which gives details on how to quilt as you go http://www.newenglandfiberarts.com/node/170 First I had to do the math. I would need 5 strips of fabric with the center one being 2-3/8" wide and the other 2 fabrics - 2 strips both 2" wide. I needed enough to have a fold over for the closure - aprox. 3", so the overall length would be 8.25"X 2(the front and the back + the 3" fold over). I was running rather low on the teal color so the length ended up being slightly less than 19" which would still give me plenty for the fold over for the front flap. I cut the backing fabric a bit longer than that since I needed to be able to fold that over to finish off the front edge of the purse near the button. The top right photo shows the purse once I had sewn the strips together using quilt as you go with the top turned under and the button sewn on. The left bottom photo shows the inside of the purse. If you look closely enough you might see the quilt as you go seams running along it horizontally This time around I secured the handle and the loop using the same stitch I use for sewing on buttons BEFORE i attached the binding. This keeps everything in place while the binding is being attached. Since the purse is all one piece I would not have to attach binding to the bottom of the purse but I once again sewed 2 lines along where the fold would be for the fold down for the flap. The purse is aprox. 1/4" thick so the lines are 1/4' apart. At this point I rounded the flap off using a small plate as my template.. Now it was time to fold the body together leaving the flap loose and attach the binding. Starting at the bottom of the purse on one side I attached a 2 1/2" binding (folded in half, of course) to the BACK of the purse ending it on the bottom of the opposite side. I folded over the binding 1/4" at the begriming and at the end so that it would be a finished edge. I then folded the binding over to the front of the purse and using a hemming stitch I attached the binding to the body of the purse ONLY. This left the flap part still to be attached. I folded that over and attached that by stitching in the ditch from the back of the purse. This way most of my sewing lines for attaching the binding would be invisible. Now that I have made two of these I am feeling a bit more confident. Making it all in one piece does speed up the process since one can use quilt as you go where as with the folk art purse the quilting had to be done separately. On this purse, I switched to a nylon braided cord for the strap since it is a bit less expensive and more widely available. I do like the overall effect of the stripes and this purse is fat quarter friendly as they say in the quilting world..COOL!
- Sandy's blog
- Log in to post comments