PLAYTIME!!!
 This time of year is a busy one what with finishing up the holiday merchandise and getting it delivered to the stores. Last Monday I had it all laid out what had to get done and when. I ended up coming down with a rather nasty upper respiratory infection which put me out of commission most of the week. It has been years since I have been too sick to get out of bed but fortunately I am now on the mend.
I found this wonderful folk art fabric this summer in the Poconos. It was in a bargain bin with other discounted fat quarters. The second I saw it, I could immediately visualize the tic tac toe hot pads I wold make out of it. I first learned how to make these tic tac toe blocks from "Quilters Playtime" by Dianne S. Hire. I find this block not only easy but fun to make. The suggestions she makes on what colors and fabrics to use, I find very helpful. I usually opt for strong fabrics and a lot of contrast with the inserts.
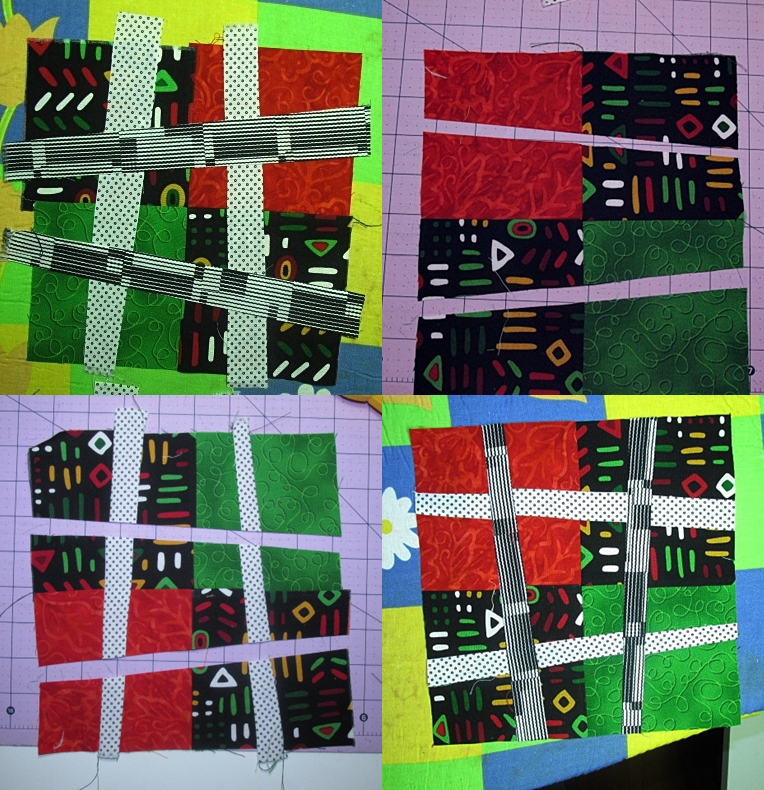
Her first suggestion is to always do a mock up and to scrunch up your eyes to scrutinize the block to see how the color and scale relationships will look. Since there is little time involved in making a 4 patch (the bases for this block) I usually do that as part of the mock up.(Top left picture). Since I have been making these block for years, i have gotten pretty adept at choosing the right fabrics for the effect I am looking for but I still do the insert mock-up. These inserts are are cut a bit wachy with one end wider than the other. Also when sewing in the inserts it is important to use a 1/8" seam allowance rather than a 1/4". To get the proper look to the block it is also important to have the cuts one makes in the 4 patch have a slight V shape to them and NOT be parallel (top right photo). You then stitch your 2 wedge shaped inserts to the middle section with the wider side up on one and down on the other. Now it is time to line up the side pieces. I eye ball this and hope for the best. She gives several steps in the directions over to this lining up process but I have found it does not yield any better of a match up then eye balling it does. Always press the inserts towards the inserts, this will make them pop out a bit, you do not want them to recede. Now it is time to cut the V shape in the other direction for the vertical inserts (bottom right photo). It is important when making all of these V cuts not to cut too close to the vertical line of the 4 patch and or go to far our towards the edge. These inserts are added in the same way as the first ones. Matching up, since there are now inserts to match up is a bit trickier. I noticed when looking at the photos in the book of other people's blocks and projects that their inserts do not match up exactly and to me, it is not imperative...in this block, close counts and does not take away from the overall effect of this fun block. Once the second set of inserts have been pressed towards the insert, it is then AND only then that I trimmed the block to 8 - 1/2 " square since it is going to be used as a hot pad. I noticed it the book that some quilters did not square off their blocks when they were being used in a wall hanging. They trimmed the tails of the inserts and did not square up the blocks and added a sash and squared the block up that way. I like the way she encourages the quilter to be creative playing tic tac toe different ways. I think this is the secret to taking something your own is adding your own spin to it and this block definitely lends itself to this.
- Sandy's blog
- Log in to post comments

 Click here to see us on Facebook
  Follow Me on Pinterest