Adventures in Stippling
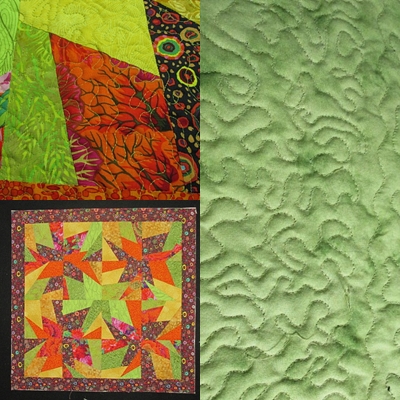
 There is always a sense of satisfaction once a quilt top is completed...time to make it into a quilt! I layered it with the the backing and the batting. The backing and batting should always be at least 2-3" larger than the quilt top. I chose a light green backing fabric that coordinated with the lighter fabrics in the quilt top. So, what color thread and I going to use for the quilting?. Since my free motion skills are a work in progress, one of the things I do is match the thread to what is being quilted so that any flaws are not as obvious. I have done some stippling on smaller projects and saw this quilt as an opportunity practice free motion quilting. The 3 layers need to be basted together either with safety pins, thread or with an adhesive basting spray (which washes right out). I used the spray.
Day 1 - I set up my machine for quilting by installing a new quilting needle - ALWAYS USE A NEW NEEDLE!! My machine came with 2 free motion quilting feet, an open toed foot and a round foot, I used the round one. I made up a practice sandwich from scrapes and proceeded to play around with it a bit. This way I could get in some much needed practice and also check to make sure the thread tension was properly set. Once I felt I had the motion it would take to stipple into my body, time to actually start on the real quilt...YIKES!
Since the quilt is 38" sq. there was a need to roll it up so that it would fit between the needle and the throat of my machine. As I progressed, I slowly unrolled it. The most difficult part of free motion quilting is maintaining a constant motion so that the stitches are uniform...another reason for choosing matching thread, this is not easy. My stippling ended up being fairly concentrated and I ran out of thread after a couple of hours so I took that as an indication it was time to quit for the day.
DAY 2 - Armed with another spool of thread, I checked out how much more I had to do, about a third. I was not quilting the border yet. Day one had gone fairly smoothly so I had a bit of confidence. I could not seem to get things going again and kept getting these rats nest tangles underneath.... which is a common occurrence for me. I put in a new needle and cleaned the lint out of the bobbin area. It was at this point I did a little research out on the web. I was rather shocked by the number of videos one can watch showing stippling AND free motion quilting. In the one I watched, the quilter was stippling a border and I immediately saw how much larger her stippling was from mine. I would have been better off making it a bit larger. Also, she was holding her hands on each side of the needle and holding the work area tight. A stippling rule, according to this video is it that it's not suppose to cross over itself...OOPS, I hadn't done that either but everyone's stippling ends up looking different so I figured mine would have some loops and cross overs in it. I finished quilting the blocks and changed the color of my thread to black and used a serpentine stitch along the inside of of the border. I then stippled the border using MUCH larger stippling. It went very quickly.
It was now time to trim the excess batting and backing off of the quilt and square it up. it is now ready to put the binding on it, which will be a solid black. So, hind sight being 20/20, right? I wish that I had only stippled the gold and green part of the quilt which would have created another aspect of them receding a bit, making the darker colors pop but all and all I am pleased with the result and will not hesitate to stipple something again. My advice...find a youtube video and watch it before you start!
- Sandy's blog
- Log in to post comments

 Click here to see us on Facebook
  Follow Me on Pinterest