 Click here to see us on Facebook
  Follow Me on Pinterest
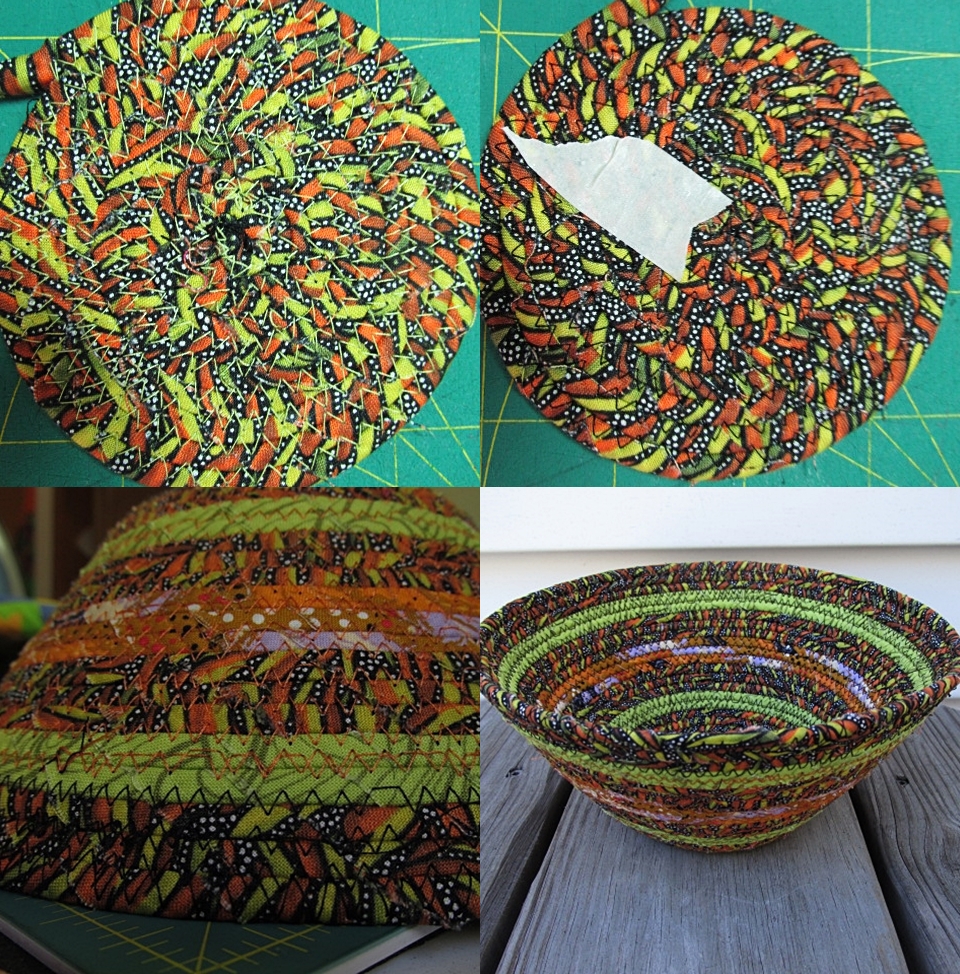
Anatomy of a bowl
 There is a love affair going on between me an Australian fabrics. I not only love the palate but also the aboriginal designs. So far I have made a runner and a wall hanging and today it was coiled fabric bowl time. The first order of business is what other fabrics was I going to use with this Australian fabric which is called Bush Yam. I picked out a scrap I had left over from another project which so PERFECTLY matched the green in the yam fabric. I also had a small amount of the kangaroo fabric which appear in both the runner and wall hanging...just enough for a small stripe in the bowl and it matched the yam color...how nice! There is a lot to things to think before one starts a bowl; the size, the shape, the # of fabrics and where they will appear, thickness of the rope and ALSO...what thread. One does not use much fabric in a bowl unless it is a large one. Yes, there is rope involved and any cotton rope that is apox 3/16" in diameter will work but not all rope is alike. Some are more tightly woven than others which affects the stiffness of the bowl. Not much is said in instructions about either the rope, the thread OR the needle. While I was making the bowl today I got thinking about what I have struggled with the most when learning to make these bowls, which I have been doing now for 2 years.
I like to do research when I am leaning to do something new. I worked from instructions that I found on the internet and followed those while I was learning to make these coiled fabric bowls. One thing that was lacking in these directions was what size needle one should use. Since this was left out, I assumed it did not matter...not so. If only there had been some directions about the importance of using the RIGHT NEEDLE, I could have avoided a lot of frustration. I have read books about making these bowls and many blogs about them over the past 2 years, It wasn't until this week that someone finally mentioned what needle one should use. Through 2 years of experimentation I had started using a microtex sharp needle size 80/12. The instructions I happened upon this week suggested the same needle size 90, almost the exact same needle.
After making these bowls for a year I bought a book about making them called "it's a Wrap 2" The author said that the best way to incorporate the next fabric strip is to get a glue stick and use a little glue. I had been over wrapping the new strip over the old strip and clipping it in place so it would not unwind before it got sewn in place. WOW, the glue was FOR ME so much better. But, once again she made it sound easy to make these bowl (it took me 6 months of practice to get a decent looking bowl) and she also said you can sew them on any old machine. I have found this not to be so. I tried sewing a bowl with a non electronic machine and it did not work...too thick. Also, someone I know attempted it with a mechanical machine and she could make a coaster but once she started tilting it to make the sides, it would not sew it.
Thread is a very important part of these bowls...it is highly visible and a lot of it gets used. The color thread can completely change the look of a bowl and I found very little written about this. When making the yam bowl I started out with a green thread in the bobbin and black thread in the spool. I sewed some and looked and did not like the looks of the green thread (top pictures) so I changed the bobbin thread to orange (bottom left photo). The bobbin thread appears on the outside of the bowl and the spool thread on the inside unless you turn the bowl inside out (yes, the bowls are reversible). In this same photo you can see where I changed the bobbin thread to black for the last 3 rounds with the bush yam fabric.
Over the past 2 years I have done a lot of experimentation with making these bowls and when learning something new, I would encourage everyone to find the best way that works for them and not follow slavishly to any one persons directions. I have gleaned a lot for different sources plus what I figured out on my own. Since I sell these bowls on consignment I have had to find the best and fastest way to make them. Many of the instructions I have read suggested unnecessary time consuming things. I try just about everything because I want to make the best bowl possible and some of them I have incorporated into my bowl making but many of them did not add to the quality of the bowl so I abandoned them. As with most things in life, there just isn't any substitute for experience and I am sure there are still plenty of things for me to learn.
- Sandy's blog
- Log in to post comments