Making the wave
.JPG)
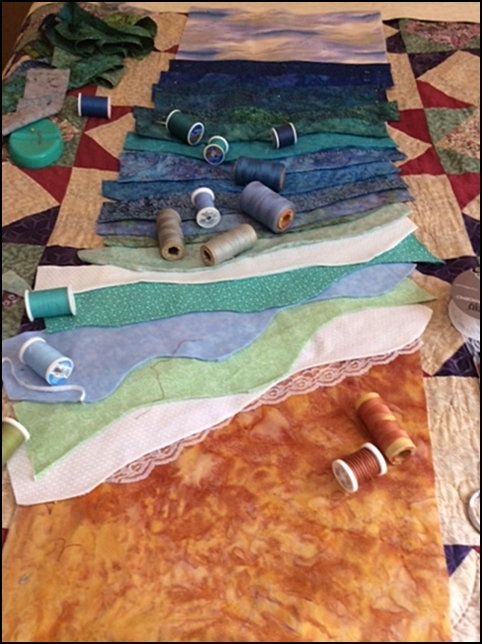
This quilt called for many light, medium and dark fabrics arranged according to value and width, the lightest and widest at the bottom. Next you draw curves on all the pieces...the deeper curves on the widest pieces gradually making the curves a bit more shallow as you go along to the darker fabrics. Once they are all cut out, you place your curved pieces on a ironing surface and gently press 1/4" along the curved edge of each piece. The initial layout (photo #1) was done on the twin bed in the small bedroom next to the sewing room . I needed a flat long surface since the piece is almost 4 feet long.! Before I took all the pieces down to my design wall to do the final layout I checked my thread inventory to see if I had all the colors needed (photo #1) since these pieces were going to be top-stitched in place, one on top of the other...WOW!
I usually keep things up on the design wall and live with them for a few days coming back and looking to make sure I have it right. As luck would have it, a fellow fiber artist, Flo Rosenstock was over at my house shortly after I had put the quilt up on the wall so I was going to have the opportunity of a second set of experienced eyes take a look. Flo noticed that the fabric I had on the horizon was not as dark as the photo in the book...YUP, she was right.. I went digging in my stash and found the perfect dark fabric which set up the proper contrast. That small adjustment really made it pop!
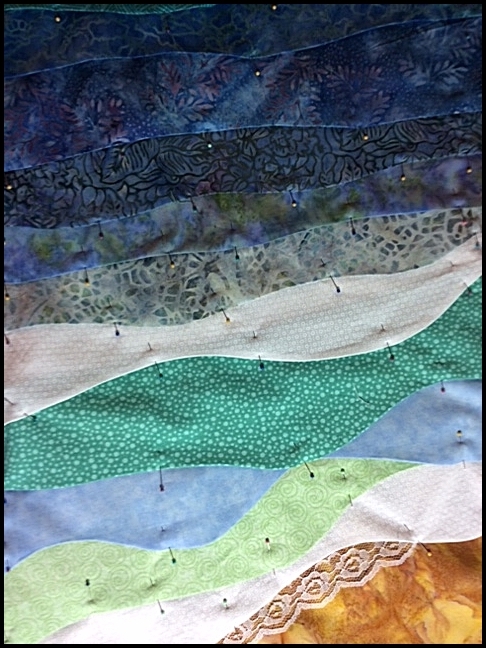
Time to make the quilt. All those curved pieces needed to be pin basted in place. (photo#2) The pieces are arranged with the batting as the foundation with each piece adjusted so that it covers the next. This took a great deal of time. Did you also notice that it is on an angle which gradually moves to the horizon? A lot of adjusting was needed to get that angle just right. The second photo shows all the pinning - ever 2" or so. ALSO, half way through the piece the curves go from being on the bottom of the pieces to the top - lots going on in this piece! The top horizontal piece is put in place once a 1/4" has been turned under and pressed. Now it was time to test my top stitching skills. Before I did that, I inserted the decorative lace along the beach edge to suggest the foam of the waves as they roll into the sand. Using thread that matches each fabric I carefully topstitched along the pressed edges.
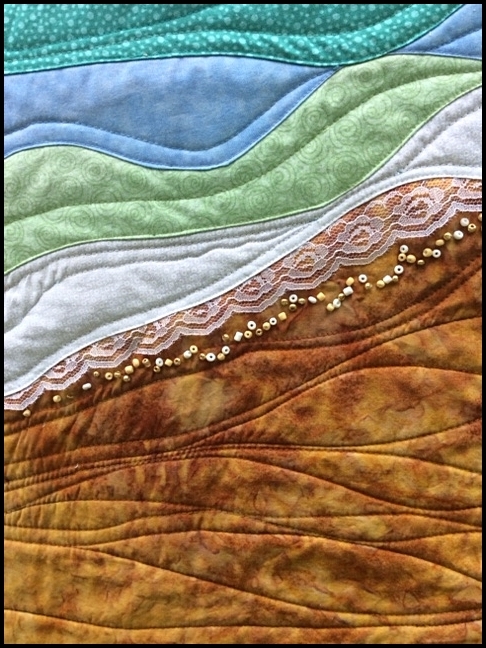
The next thing to do was to cut out the backing fabric which I adhered to the batting with batting spray. I then machine quilted it using variegated thread on the beach and 2 or 3 curvy lines on each strip with matching thread, being careful to not cross any of the lines of quilting. I then free motion quilted the sky. The last little detail was to hand stitch pearl and gold beads to the sand along the white fabric strip. I chose one of the darker blue fabrics to bind it with. DONE!!!! (bottom left photo) I am proud to say, I only had to go back to one piece at the top stitching and rip a small amount out. It had popped out since it was less than a 1/4" turned edge. The last photo is the detail of the beach with the beads, lace and quilting.
I am not sure if I will ever use this technic again since it is VERY labor intensive but it is always a relief when I give something new a try and it ends up turning out.
- Sandy's blog
- Log in to post comments

 Click here to see us on Facebook
  Follow Me on Pinterest

