 Click here to see us on Facebook
  Follow Me on Pinterest
Peek-a-boo coiled fabric wall hanging
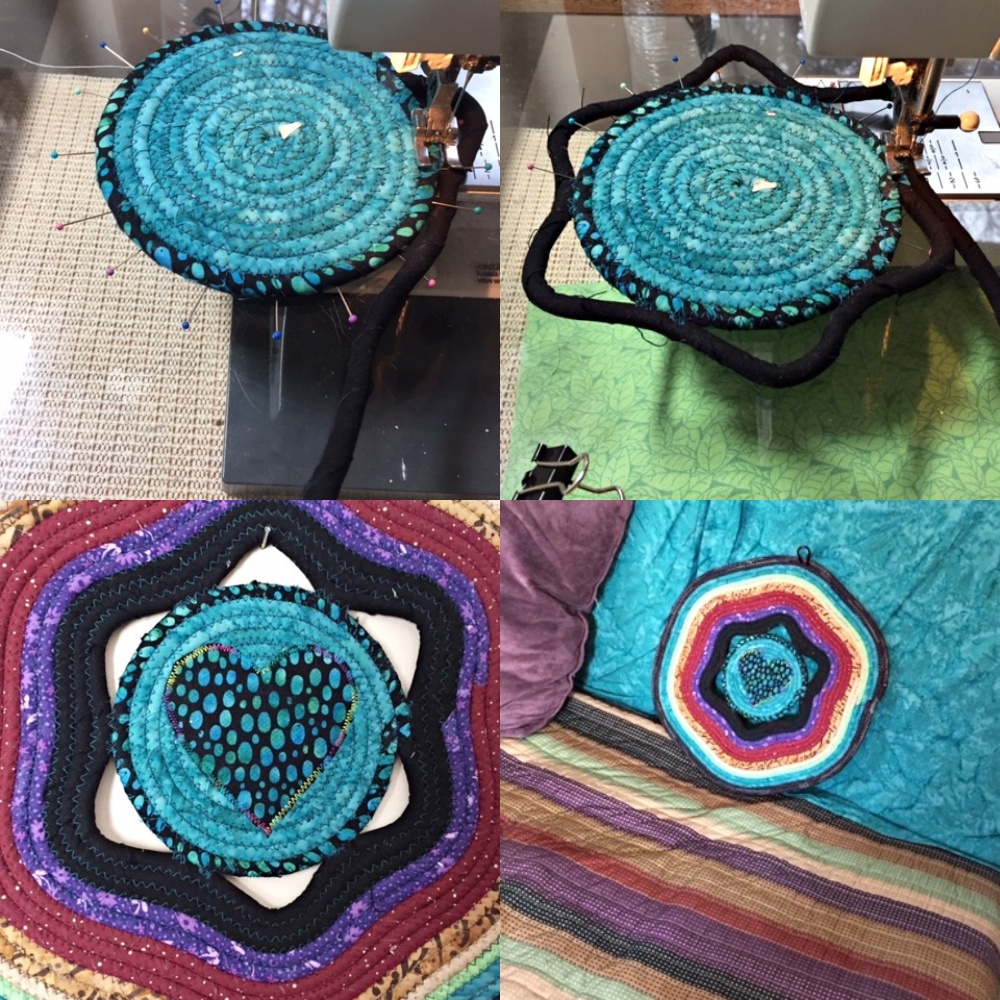 It is difficult to believe it has been such a long time since I have updates by blog. I am indeed still sewing and still in business though it is a bt slower with sales at the retail stores that carry my work. It was busy over the holidays and thankfully my sales were strong. Here in the deep of winter is when I work on personal projects and try new things to keep the creative juices flowing. These 4 photos are of a 14" coiled fabric wall hanging I made as a gift for my daughter.
My daughter bought her first house in the Spring of 2020. The great thing about this is that she did this in spite of the pandemic. We had a daybed in the attic which use to be her bed. When asked if she wanted it for her house she said heck yes. She bought a stripped cover and 3 odd shaped wedged pillows for it. She asked me if I would be willing to make covers for these pillows. This is a bit out of my skill set but I gave it a whirl. I found a teal batik that she likes that I would use for the covers. Tahnkfully my daughter was not concerned that the covers did not fit perfectly, I had plenty of fabric left over so as a valentine gift I though I would experiment with making a coiled fabric wall hanging to go in the room. I had her send me a photo so I could remember what colors where in the cover. This would be my pallet, My first idea was to make it round like a large trivet. After sleeping on it I came up with the idea of putting opening around a heart.
The next step was to pull fabrics from my stash and try and made something visually pleasing using the color pallet from the day bed cover. I did the best I could to match the colors from just a photo.. Now it was time to design it and begin!
I made the center from the left over fabric from the pillow covers and added this wonderful black and teal batik for some visual interest since all the other fabrics were almost solid. Since black was the color that would stand out the most, I felt it belonged as the one that would be used around the openings. I wanted the openings to look fairly uniform so I places pins around the circle where the center of the openings would be and measured to see if they were the same distance apart.. I then pinned where the beginning and ending of each opening would be. This took a bit of finagling so that the openings would wind up uniform. It took about an hour to accomplish this. I knew once I had the first row of the openings done the rest would go quickly. I used the progression of the stripes on the cover as a guide as to what colors would come next. The bottom left photo is a close up on the heart which I used colorful variegated thread for the applique. I really wanted it to stand out. I had no idea how big it would end up being but it hold me when it was done. I did two rounds of a black dot to finish it off with along the edge. I was pleased with the results.
I sent a picture of it to my daughter and she loved it. She then told me she needed something for the wall in the office where the day bed lives....COOL! I delivered it to her yesterday and saw that a few of my color choices (the purple and the green) were a bit off but that was the perfectionist in me talking. The bottom right photo is the hanging on the day bed leaned up against the pillow cover I made with the day bed cover in the foreground. It will be hung at the head of the bed. By husband never really has comments about what I make but he did say he would be okay with one of these finding it's way onto one of our walls. That did indeed make me feel good!
I
- Sandy's blog
- Log in to post comments